Corrections
Residential Design Using Revit Architecture 2009
A pdf version of these corrections are also available. Download the pdf.
- View Corrections
- Submit Corrections
Corrections
- Chapter 1 Page 14
Step 3: Add “Click OK;” to the beginning.
- Chapter 1 Page 15
Omit the sentence prior to step #1; a file from the CD is not used here.
- Chapter 1 Page 16
“Using zoom and pan tools” section: [replace with]
Using Zoom and Pan tools:
 You can access the zoom tools from the View Toolbar, or the View pull-down menu and the scroll wheel on your mouse.
View Toolbar commands (from left to right)
- Dynamically modify view
- Zoom In (includes drop-down arrow for additional zoom tools)
- Thin Lines (to be covered in a later lesson)
- Show Mass
- Default 3D view
- Chapter 1 Page 18
Replace entire page. (printing errors):
Default 3D View
Clicking on the Default 3D View icon loads a 3D View in another drawing window. This allows you to quickly switch to a 3D view.7. Click on the Default 3D View icon.
8. Click on the Window pull-down menu and notice the 3D view and the Floor Plan view are both listed at the bottom.
REMEMBER: You can toggle between views here.9. Click the Esc key to close the Window menu.
ViewCube
The ViewCube gives you convenient view control over the 3D view. This technology has been implemented in many of Autodesk’s programs to make the process seamless for the user.10. You should notice the ViewCube in the upper right corner of the Drawing Window (Figure 1-5.5). If not, you can turn it on by clicking on the ViewCube option in the Window pull-down menu.
TIP: The ViewCube only shows up in 3D views.
Hovering your cursor over the ViewCube activates it. As you move about the cube, you see various areas highlight. If you click on one, you will be taken to that highlighted area in the Drawing Window. You can also click and drag your cursor on the cube to “roll” the model in an unconstrained fashion. Clicking and dragging the mouse on the “frisbee” below the cube allows you to spin the model without rolling. Finally, you have a few options in a right-click, and the Home icon just above the Cube gets you back to where you started if things get too messed up!
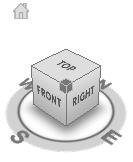
Figure 1-5.5 ViewCube11. Give the ViewCube a try. Click the Home icon when you are done.
- Chapter 1 Page 19
Replace entire page (printing errors):
SteeringWheel
Similar to the ViewCube, the SteeringWheel aids in navigating your model. With the SteeringWheel you can walk through your model, going down hallways and turning into rooms. Revit is not advanced to the point where the doors will open for you; thus, you walk through closed doors or walls as if you where a ghost!It is way too early in your Revit endeavors to learn about the SteeringWheel just yet. Once you get to the end of this book, you can take a look at the bonus videos on the DVD that came with this book if you want to see this feature in action.
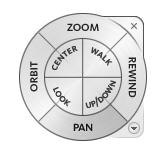
Figure 1-5.6 SteeringWheel12.Close the i_drawing_exercise project without saving.
Using the Scroll wheel on the mouse
The scroll wheel on the mouse is one of the best improvements to the computer in recent years. In Revit you can Pan and Zoom without even clicking a zoom icon. You simply scroll the wheel to zoom and hold the wheel button down to pan. This can be done while in another command (e.g., while drawing walls). Another nice feature is that the drawing zooms into the area near your cursor, rather than zooming only at the center of the drawing window.
- Chapter 3 Page 3
Omit the two sentence paragraph after step #3.
- Chapter 3 Page 14
Fig. 3-1.15: Change “step 41” to “step 43” and change “step 44” to “step 46”.
- Chapter 3 Page 14
Last paragraph: Change “step 45” to “step 47”.
- Chapter 4 Page 27
Last paragraph: Change “or” to “of”.
- Chapter 4 Page 28
Step 76: Add “Select ‘Radial’ on the options Bar” to the beginning.
- Chapter 4 Page 28
Fig. 4-2.19: Change “or” to “of”.
- Chapter 5 Page 1
Last paragraph: Change “default template” to “recent files view”.
- Chapter 5 Page 8
Step 1: Change “form” to “from”.
- Chapter 5 Page 48
Third paragraph: Change “forth” to “fourth”.
- Chapter 8 Page 31
Step 3: Change “Troffer-2x4 parabolic.rfa” to “troffer Light – 2x4 parabolic.rfa”.
- Chapter 8 Page 32
Step 4: Same change as above.
- Chapter 10 Page 24
“Tip” box: Change “Hide Annotation In View” to “Hide In View-> Elements”.
- Chapter 11 Page 11
Paragraph below Fig. 11-2.5: Change “gone” to “done”.
- Chapter 11 Page 17
Sentence after step 38: Change “new” to “now” and “fit” to “fix”.
- Chapter 11 Page 24
Change “modern medium 2008” to “modern medium 2009”.
- Chapter 11 Page 30
Self-exam #2: Change question to “You do not need to be connected to the internet when you click web library in the recent files view”.
- Chapter 13 Page 8
Step 23 “FYI” section: Change “window” to “Winter”.
- Chapter 13 Page 14
Step 5, “Tip” section: Change “for” to “from” in both sub-items a & b.
Submit Corrections
Your information will remain private. We will only use your information if we need to contact you for further details regarding the correction you submit.